Showing posts with label journal. Show all posts

Sunday, June 13, 2010

A Little Purple Luxury

I am once again low on every type of supply but decorative paper, so I made a fancy and luxurious book using the one thing I do have at the moment. This one took a very long time to put togetherer. The back stitching is all in silk thread, and then there's all the embossed detail under the leather. I'm really loving that technique. I think it adds so much to the cover, and while it can be time consuming, is really not very difficult. I did two layers to get the effect I wanted, the lattice pattern (to match the embroidery) and the damask on top, to make sure the edges stood out.
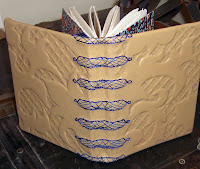
On the inside I used a very rich textured purple (same type of paper as the red in The Tell-Tale Heart) that was very annoying to rip and I made a big mess of my sheet. I hope there's enough for another project, but I really did a number on it. The other paper is a really nice Japanese one I just picked up. I wanted something a little over-the-top that just pops whenever you open the book.

This one is for sale on Etsy.

Tuesday, December 8, 2009


My newest book might just be my favourite one yet! The idea for this one came about because I joined the etsy bookbinding street team (BEST) around Hallowe'en and they were having a themed contest. I have a great idea for a monster book next year, but didn't really want to wait. So I adapted it to be more on the prettier side with some nice sheet music. I like open bindings when I cover the signatures with patterned paper. I've never done the raven's foot binding before, and it turned out really neat. A few hours at work well spent! I hate the mall.

How to Antique Paper


I'm not going to lie - I make really nice antique paper. And it's quite simple, you just need a little bit of patience to do it in layers.

1. Use heavy paper. If you want to antique something that's been printed, do it first and use waterproof ink.

2. Crumple the paper. The colours will soak into the crinkled parts for those nice long veins in the paper.

3. Cover with coffee, tea, some combo of both for your base colour. Add ink or watercolour to this mix if you want it to have a certain colour to it. In this one I added a bit of scarlet ink to coffee because it's going to match reddish leather. Cover the entire paper.


4. Add coffee grinds in certain areas, they'll stain it darker. Add salt on top of that, it'll soak up the colour and leave lightened areas. You can also use tea leaves, watercolour, ink spots, etc. You can press paper with non-waterproof ink onto it to tranfer some of the colour. It's going to take a while to dry, so leave it alone!

5. When it's dry remove all the grinds/salt etc. The salt will very likely leave little shiny things on the paper, so if you have a stiff brush use it to remove them. I usually put another thin layer of coffee/tea on at this point to get rid of the rest of the salt, and make it a little darker.

6. Repeat steps 4/5 until it looks the way you want. Try adding very strong coffee where the crinkles in the paper are so that they become really pronounced, and dripping dark coffee or ink on it from above for a different pattern to the staining. Using more than one medium to unevenly stain the paper - as in not just a quick coffee bath - makes the paper much more interesting.


7. If you need to smooth the paper out after it's done flip it over and iron it. You can use steam and a fairly high setting, just don't hold it on any one place too long. If you have a big enough board and table you can mist it with just a little bit of water and press it flat. Use lots of books for weight and then have patience until it's totally dry!